
ども、なのまるです。
結構古めの「Amazon Linux」を最新の「2014.09」にアップデートしてみました!
そしたらハマりました~
もくじ
「Amazon Linux」をアップデートしたらハマった!
この古い「Amazon Linux」をアップデートしたら、SSHだけつながらなくなったので困りました。結果、解決したんですがその顛末を残しておきたいと思います。
前提条件
- Amazon Linux が2年以上前のもの (今回は「2012.09」)
- OpenSSHがバージョン「openssh-5.3p1」
OSの状態
アップデート前 __| __|_ )
_| ( / Amazon Linux AMI
___|\___|___|
https://aws.amazon.com/amazon-linux-ami/2012.09-release-notes/
アップデート後
       __|  __|_  )
       _|  (     /   Amazon Linux AMI
      ___|\___|___|

https://aws.amazon.com/amazon-linux-ami/2014.09-release-notes/
原因は「OpenSSH」のアップデート
アップデート前openssh-5.3p1-81.19.amzn1.x86_64(おそらくw)
アップデート後
openssh-6.2p2-8.42.amzn1.x86_64
/etc/ssh/sshd_configの差分
--- sshd_config.bak     2013-01-21 06:32:06.064836211 +0000
+++ sshd_config 2014-12-01 09:28:43.518105312 +0000
@@ -1,4 +1,4 @@
-#      $OpenBSD: sshd_config,v 1.80 2008/07/02 02:24:18 djm Exp $
+#      $OpenBSD: sshd_config,v 1.89 2013/02/06 00:20:42 dtucker Exp $

 # This is the sshd server system-wide configuration file.  See
 # sshd_config(5) for more information.
@@ -7,24 +7,27 @@

 # The strategy used for options in the default sshd_config shipped with
 # OpenSSH is to specify options with their default value where
-# possible, but leave them commented.  Uncommented options change a
+# possible, but leave them commented.  Uncommented options override the
 # default value.

+# If you want to change the port on a SELinux system, you have to tell
+# SELinux about this change.
+# semanage port -a -t ssh_port_t -p tcp #PORTNUMBER
+#
 #Port 22
 #AddressFamily any
 #ListenAddress 0.0.0.0
 #ListenAddress ::

-# Disable legacy (protocol version 1) support in the server for new
-# installations. In future the default will change to require explicit
-# activation of protocol 1
-Protocol 2
+# The default requires explicit activation of protocol 1
+#Protocol 2

 # HostKey for protocol version 1
 #HostKey /etc/ssh/ssh_host_key
 # HostKeys for protocol version 2
 #HostKey /etc/ssh/ssh_host_rsa_key
 #HostKey /etc/ssh/ssh_host_dsa_key
+#HostKey /etc/ssh/ssh_host_ecdsa_key

 # Lifetime and size of ephemeral version 1 server key
 #KeyRegenerationInterval 1h
@@ -47,11 +50,17 @@
 #MaxAuthTries 6
 #MaxSessions 10

-RSAAuthentication yes
-PubkeyAuthentication yes
+#RSAAuthentication yes
+#PubkeyAuthentication yes
+
+# The default is to check both .ssh/authorized_keys and .ssh/authorized_keys2
+# but this is overridden so installations will only check .ssh/authorized_keys
 AuthorizedKeysFile     .ssh/authorized_keys
-AuthorizedKeysCommand none
-AuthorizedKeysCommandRunAs nobody
+
+#AuthorizedPrincipalsFile none
+
+#AuthorizedKeysCommand none
+#AuthorizedKeysCommandUser nobody

 # For this to work you will also need host keys in /etc/ssh/ssh_known_hosts
 #RhostsRSAAuthentication no
@@ -65,7 +74,6 @@

 # To disable tunneled clear text passwords, change to no here!
 #PasswordAuthentication yes
-PasswordAuthentication no
 #PermitEmptyPasswords no
 # EC2 uses keys for remote access
 PasswordAuthentication no
@@ -83,8 +91,6 @@

 # GSSAPI options
 #GSSAPIAuthentication no
-#GSSAPIAuthentication yes
-#GSSAPICleanupCredentials yes
 #GSSAPICleanupCredentials yes
 #GSSAPIStrictAcceptorCheck yes
 #GSSAPIKeyExchange no
@@ -98,16 +104,12 @@
 # If you just want the PAM account and session checks to run without
 # PAM authentication, then enable this but set PasswordAuthentication
 # and ChallengeResponseAuthentication to 'no'.
+# WARNING: 'UsePAM no' is not supported in Fedora and may cause several
+# problems.
 #UsePAM no
 # Leaving enabled as described so that account and session checks are run
 UsePAM yes

-# Accept locale-related environment variables
-AcceptEnv LANG LC_CTYPE LC_NUMERIC LC_TIME LC_COLLATE LC_MONETARY LC_MESSAGES
-AcceptEnv LC_PAPER LC_NAME LC_ADDRESS LC_TELEPHONE LC_MEASUREMENT
-AcceptEnv LC_IDENTIFICATION LC_ALL LANGUAGE
-AcceptEnv XMODIFIERS
-
 #AllowAgentForwarding yes
 #AllowTcpForwarding yes
 #GatewayPorts no
@@ -116,12 +118,11 @@
 #X11DisplayOffset 10
 #X11UseLocalhost yes
 #PrintMotd yes
-#PrintLastLog yes
 # Explicitly enable
 PrintLastLog yes
 #TCPKeepAlive yes
 #UseLogin no
-#UsePrivilegeSeparation yes
+UsePrivilegeSeparation sandbox         # Default for new installations.
 #PermitUserEnvironment no
 #Compression delayed
 #ClientAliveInterval 0
@@ -129,16 +130,27 @@
 #ShowPatchLevel no
 #UseDNS yes
 #PidFile /var/run/sshd.pid
-#MaxStartups 10
+#MaxStartups 10:30:100
 #PermitTunnel no
 #ChrootDirectory none
+#VersionAddendum none

 # no default banner path
 #Banner none

+# Accept locale-related environment variables
+AcceptEnv LANG LC_CTYPE LC_NUMERIC LC_TIME LC_COLLATE LC_MONETARY LC_MESSAGES
+AcceptEnv LC_PAPER LC_NAME LC_ADDRESS LC_TELEPHONE LC_MEASUREMENT
+AcceptEnv LC_IDENTIFICATION LC_ALL LANGUAGE
+AcceptEnv XMODIFIERS
+
 # override default of no subsystems
 Subsystem      sftp    /usr/libexec/openssh/sftp-server

+# Uncomment this if you want to use .local domain
+#Host *.local
+#      CheckHostIP no
+
 # Example of overriding settings on a per-user basis
 #Match User anoncvs
 #      X11Forwarding no
このsshd_configを「openssh-6.2p2-8.42.amzn1.x86_64」のものに入れ替えることで、動作させました。
詳細な原因は追い切れていないのですが、ちょうど同じ現象になったことがあるということで、この対応になりました。
対処方法
再起動してしまったあとでは、AWSは直接接続できる「コンソール」を用意していないためどうにもなりませんでした。(方法はあるのかも・・・)そこで、新しいインスタンスにEBSをマウントしてファイルを編集するという方法をとりました。
復旧手順
- 対象の接続できないEC2インスタンス(A)をSTOP
- EC2インスタンス(A)のRoot device名を確認する
- 新しいEC2インスタンス(B)を作成・起動
- EC2インスタンス(A)のEBS VolumeをDetach
- EC2インスタンス(B)にEC2インスタンス(A)のEBS Volumeをattach
- EC2インスタンス(B)で、マウント・ファイル編集
- EC2インスタンス(B)からDetach
- EC2インスタンス(A)にattachしなおす
スクリーンショット入れようとしましたが、大人の事情で載せられない情報がたくさんで「モザイクだらけ」になるのでやめましたw
対象の接続できないEC2インスタンス(A)をSTOP
ManagementConsoleか、何かしらの形でインスタンスをSTOPしてくださいEC2インスタンス(A)のRoot device名を確認する
インスタンスの詳細画面から「Root device」名を確認しておいてください。やってなくてハマったw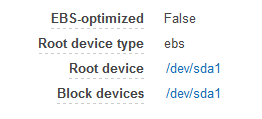
新しいEC2インスタンス(B)を作成・起動
新しいインスタンスを立ち上げます。既存のインスタンスでもいいですw
EC2インスタンス(A)のEBS VolumeをDetach
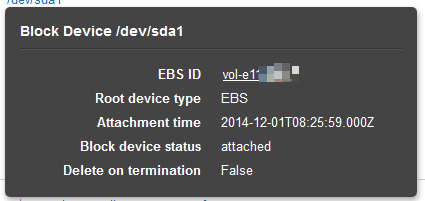
修正したいインスタンスの「EBS ID」を確認してVolumeメニューから「Detach」EBS IDを確認
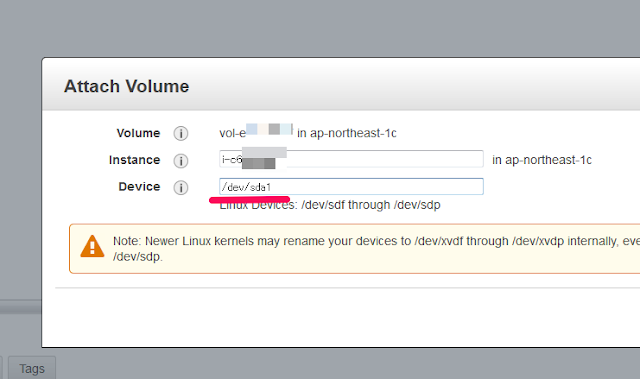
EC2インスタンス(B)にEC2インスタンス(A)のEBS Volumeをattach
Volumeメニューから対象のEBSをマウントします。マウント先はデフォルトのままにしました。「/dev/sdf」
EC2インスタンス(B)で、マウント・ファイル編集
こんな感じで編集しました。mount /dev/sdf /media cd /media/etc/ssh/ mv sshd_config sshd_config.bak cp -a sshd_config.rpmnew sshd_config cd / umount /media
EC2インスタンス(B)からDetach
書き換えが終わったら、アンマウントして「Detach」しますEC2インスタンス(A)にattachしなおす
元のインスタンスにattachし直しますが、Deviceの指定で以前のものを使いましょうwこれちゃんと設定しないと起動しませんでした~
まとめ
- アップデート前にsnapshotを取るべきでしたw
- うーん、このハマり方結構レアっぽいです~
- こうやって、EBSマウントしてほかのEC2インスタンスからファイル編集するんだ!って勉強になりました